Since UCS has redundant FI’s taking for granted that a dual SAN fabric is being used. This is tailored around how I setup Boot SAN’s for the UCS but would be the standard for most situations. FI SAN ports should be in Endhost Mode especially if connecting to multiple SAN’s. Switchmode will add a Domain ID to a SAN and cause issues.
First get FC uplinks setup. The below is for the 6200 series FI. 6100 series the FC module must be Endhost or switch mode.
Fibre Channel uplink ports on Cisco UCS 6248 fabric interconnects
https://realworlducs.com/cisco-ucs-policy-based-zoning-no-brocade-neighbors/
Decide uplink configuration. Since writing the below article I don’t use pinning any longer. Go VSAN.
Cisco UCS FC uplinks to Brocade Fabric
https://realworlducs.com/cisco-ucs-fc-uplinks-brocade-fabric/
Typical Brocade fabric for UCS will look like this

Remember one FI to one Brocade. Also DO NOT link the Brocades! Dual Fabric with separate Zonesets is the only way to go.
Each Brocade should connect to each Controller on the SAN Device at least once. Each FI should connect to its Brocade at least twice and put those ports in a VSAN individual to each FI.
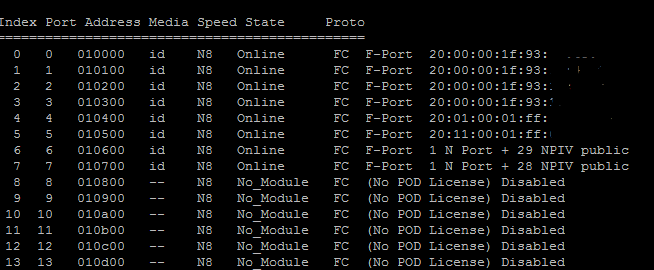
NPIV should be enabled by default on Brocades. Just plug the FI into Brocade and soon as multiple logins happen on that port it will switch to NPIV. The below picture shows NPIV ports. Also note once SAN controller ports are plugged in this is an easy way to cut and paste them for alias creation. Each Controller should be seen on each Brocade. Good Alias names help like ali_ctl1_p1 etc.
A good place to export a CSV from of all Service Profile and WWPN/Initiators is SAN/Pools/Initiators.

Below is all based on Perl, but if you are a PowerShell person checkout Generate SAN Zones for Cisco or Brocade with UCS
Always Zone with “Initator => Target” as a single Zone. So four paths would be four Zones. “Keep it Clean”, no more than two WWPN’s belong in one room alone.
If you have not setup a Brocade before via serial set network settings.
# Check network settings
BootSwitch:admin> ipaddrset
BootSwitch:admin> ipaddrshow
After that Everything can be done in the Web GUI. But to setup a basic Zoneset do the below via the CLI.
# Clear any existing
Switch:admin> cfgclear
# Create Zoning Config, show not have be default. Switches come “Open”. To create a Zoneset called “BootA” with an empty zone called “UCS_to_BootSAN” do the folowing:
BootSwitch:admin> cfgCreate “BootA”, “UCS_to_BootSAN”
A Zoneset (or also known as Zone Config) a Zone has to be added. Even if Empty.
# Save memory
sw77:admin> cfgsave
# Enable new Zoneset
BootSwitch:admin> cfgEnable “BootA”
Every time a new zone is added a cfgsave & cfgEnable is needed. They show all kinds of warnings when done, “just do it”. Not sure why Brocade makes it look so scary.
I usually make a BootA and a BootB to match FIA and FIB.
Here is an example of a zoneset to add a Service Profile’s vHBA’s to a SAN Device.
First put the list of Service Profiles and their vHBA’s in a CSV
localhost# cat MakeBootCSV.csv
ServiceProfile01,20:00:00:25:B5:00:00:EA,20:00:00:25:B5:00:00:2A
Notice below that aliases for SAN Device controller ports must be created first. This is for a EMC/VNX and those have odd controller port names like “ali_VNX_B7”. Each vHBA will need to see each SAN Device controller.
Script for BootA Brocade
#!/usr/bin/perl
use strict;
open(SOURCE, “<./MakeBootCSV.csv”) or die “Cannot open MakeBootCSV.csv\n”;
my @source=(<SOURCE>);
foreach my $line(@source) {
chomp $line;
my ($hostname,$boot_a,$boot_b) = split(“,”,$line);
print “zoneCreate \”zone_VNX_B7_$hostname\”, \”ali_$hostname; ali_VNX_B7\” \n”;
print “zoneCreate \”zone_VNX_A6_$hostname\”, \”ali_$hostname; ali_VNX_A6\” \n”;
print “cfgadd \”BootA\”, \”zone_VNX_B7_$hostname\” \n”;
print “cfgadd \”BootA\”, \”zone_VNX_A6_$hostname\” \n”;
}
Script for BootB Brocade
#!/usr/bin/perl
use strict;
open(SOURCE, “<./MakeBootCSV.csv”) or die “Cannot open MakeBootCSV.csv\n”;
my @source=(<SOURCE>);
foreach my $line(@source) {
chomp $line;
my ($hostname,$boot_a,$boot_b) = split(“,”,$line);
print “zoneCreate \”zone_VNX_A7_$hostname\”, \”ali_$hostname; ali_VNX_A7\” \n”;
print “zoneCreate \”zone_VNX_B6_$hostname\”, \”ali_$hostname; ali_VNX_B6\” \n”;
print “cfgadd \”BootB\”, \”zone_VNX_A7_$hostname\” \n”;
print “cfgadd \”BootB\”, \”zone_VNX_B6_$hostname\” \n”;
}
Output from BootA and BootB
BootA
zoneCreate “zone_VNX_B7_ServiceProfile01”, “ali_ServiceProfile01; ali_VNX_B7”
zoneCreate “zone_VNX_A6_ServiceProfile01”, “ali_ServiceProfile01; ali_VNX_A6”
cfgadd “BootA”, “zone_VNX_B7_ServiceProfile01”
cfgadd “BootA”, “zone_VNX_A6_ServiceProfile01”
BootB
zoneCreate “zone_VNX_A7_ServiceProfile01”, “ali_ServiceProfile01; ali_VNX_A7”
zoneCreate “zone_VNX_B6_ServiceProfile01”, “ali_ServiceProfile01; ali_VNX_B6”
cfgadd “BootB”, “zone_VNX_A7_ServiceProfile01”
cfgadd “BootB”, “zone_VNX_B6_ServiceProfile01”
The above output will be added via CLI to the corresponding Brocade. This should show four paths to Storage Device for host, two per vHBA.
Always remember cfgsafe and cfgeable!
What would be GREAT is a PowerShell script that would pull the Service Profile & WWPN info from the UCS and login to each Brocade and apply zoning. Would add to this post of any PowerShell hardguys want to create that. Hint Hint.
If you are not using Brocades checkout “Cisco UCS Policy Based Zoning and No Brocade Neighbors”
Read more: https://realworlducs.com/page/3/#ixzz2jtIrDLtG
Be First to Comment